|
Youth Baseball Throwing Fundamentals Made EasyThese baseball throwing fundamentals are designed for parents, managers and coaches to instruct players on properly throwing the baseball to: 1. Improve your throwing accuracy 2. Maximize your throwing speed 3. Improve the speed of the glove to hand exchange 4. Reduce the risk of arm injuries
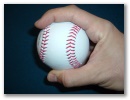
It all starts here! The key to baseball throwing fundamentals starts with holding the ball correctly. The correct way to hold a baseball is using what’s called a 4-seam grip (see diagram #1). Note – Pitchers grips can and will vary, as ball movement may be desired to deceive hitters. This grip should be used by all other positions.
Diagram #1
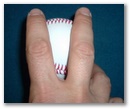
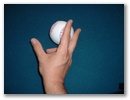
Notice: (Diagram #2 and #3 below) - You should only use your index and middle fingers and your thumb. - Your index and middle fingers should be on top of the ball crossing the widest seams (see diagram #2). - Your thumb will support the weight of the ball on the bottom of the grip (see diagram #3). - Don’t squeeze the ball, but hold it tight enough so you won’t drop it. - Leave a little space between the ball and your hand.
Diagram #3
Advantages of using this grip: * Better accuracy, as the ball is less likely to tail away from your target. * Ball will travel further with less effort, as it takes a more direct route to the target. * Ball will get to the target faster, as it takes a more direct route.
The last motion before you release the baseball should be a wrist flicking motion toward your target that creates a backspin on the baseball. Even though it’s the last motion in the process, it should be taught and practiced before the rest of the motion as it should be reinforced as the others parts are learned. This motion, combined with the 4-seam grip, will ensure you maximize the above referenced advantages of this technique. (See Diagram's #4 and #5 for this motion illustrated)
Diagram #5 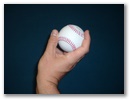
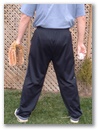
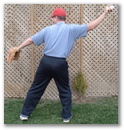
Bringing it all Together with the Proper Upper/Lower Body MovementsWe'll cover 4 steps in this section to complete the baseball throwing fundamentals technique: 1. Ready Position - Naturally, you'll be holding the ball in your throwing hand using the 4-seam grip to begin, right? - The ready position includes your glove side should/arm facing your target as you look at your target (see Diagram #7).
Diagram #8
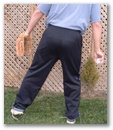
2. Weight Transfer - Your weight should shift to your rear leg (throwing arm side leg - see Diagram #9).
Diagram #9
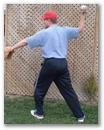
- Once your weight has shifted to your back foot, your throwing arm will extend away from your target (4-seam hold, fingers on top, thumb on bottom) while your glove arm extends toward the target. Take a small step toward your target as your arms extend. This will begin the transition of your weight from back to front. Proper weight transition will give you better leverage, thus more power behind your throw. This increases the velocity of your throw (see Diagram #10).
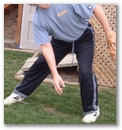
- This baseball throwing fundamentals step begins by simultaneously: * Pivoting your waist/hips to square with your target* Pulling your glove away from the target* Moving your arm toward the target(elbow will be below ball)(see Diagram #11)
Diagram #11
4. Follow Through - Upon releasing the ball to its target, continue your throwing arm down (towards the ground) and across your body. - Immediately follow with your throwing arm leg around and in from of your glove side leg. (Diagram #12 illustrates these 2 moves).
Diagram #12
The only way to prevent an arm injury is to avoid play. These techniques will reduce the risk. If you have arm issues, check this site out for treatment options.
Return from Baseball Throwing Fundamentals back to Fundamentals main page
|